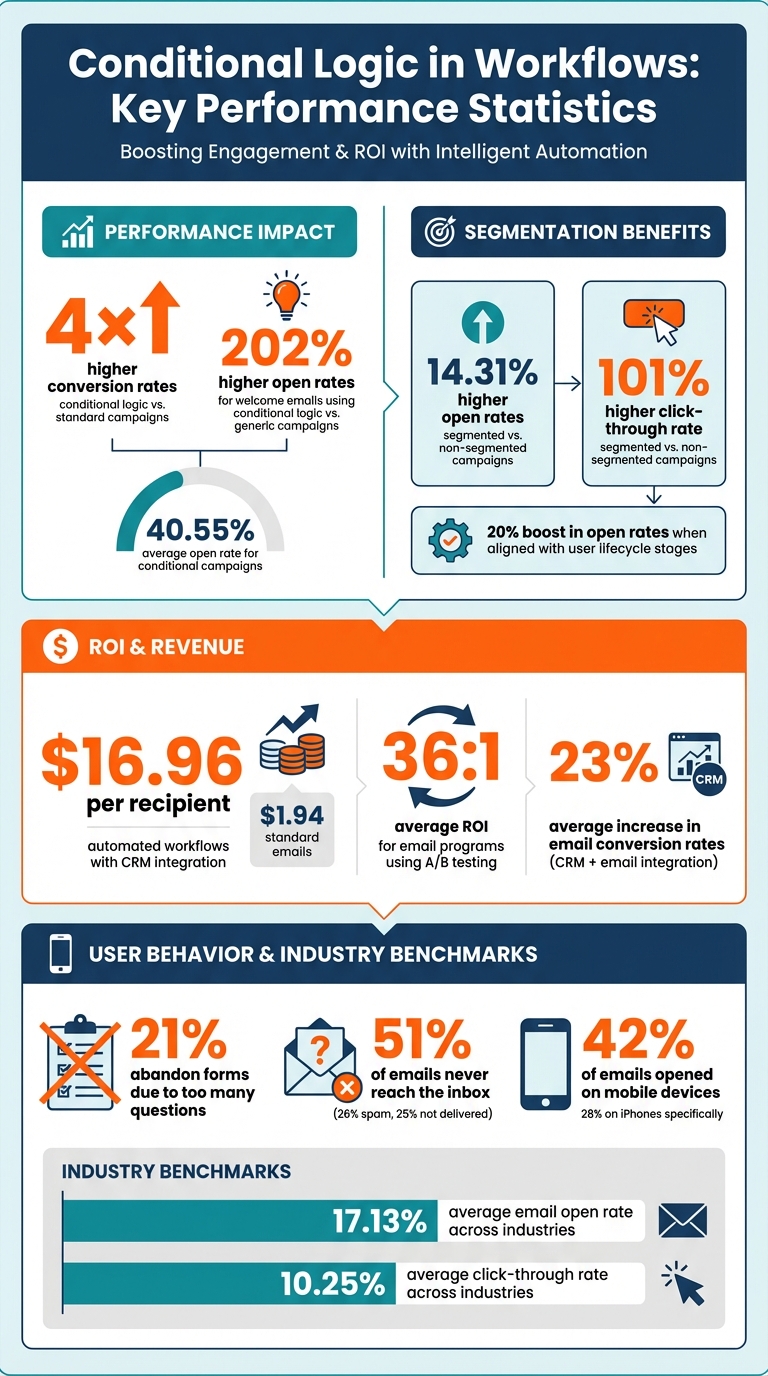
Conditional logic is the engine behind personalized and automated workflows, enabling targeted communication based on user actions like email opens, purchases, or website visits. This approach boosts email performance, with conversion rates nearly 4× higher than standard campaigns and open rates averaging 40.55%. For example, welcome emails using conditional logic see open rates 202% higher than generic campaigns.
To get it right, prioritize simplicity. Overcomplicated conditions can lead to errors, broken workflows, and frustrated users. Start small and limit branching depth to 2–3 conditions per question. Use clear trigger-to-action mappings, fallback branches, and avoid deeply nested conditions. Testing is critical - simulate scenarios, validate data, and ensure workflows run smoothly before launch. Afterward, track performance metrics like open rates and click-through rates to refine workflows.
Integration with CRM systems and dynamic segmentation further enhances targeting. Sync real-time data between platforms to trigger relevant workflows and ensure accurate lead scoring. Document rules clearly and optimize workflows for mobile devices to ensure a consistent experience. By following these practices, you can create workflows that are efficient, error-free, and tailored to user behavior.
Conditional Logic Workflow Statistics: Performance Metrics and Best Practices
Core Principles for Building Conditional Logic
Keep Conditions Simple and Clear
When it comes to conditional logic, simplicity is key. Studies reveal that 21% of users abandon forms because there are "too many questions". Overcomplicating conditions can disrupt workflows and frustrate users. Instead of diving into complex branching right away, follow Gall's Law, which states: "Any complex system can only be created by improving an existing simple system". Start small - like with a basic time-based drip campaign using one of the best email marketing platforms for small businesses - and gradually add behavior-based logic.
To keep things manageable, restrict branching depth to 2–3 conditions per question. This helps avoid user confusion and reduces system strain. If you notice you're duplicating conditions repeatedly, it might be time to consolidate. Tools like "exit conditions" or "teleport nodes" can also help streamline workflows by removing contacts once they've achieved their goal.
These straightforward practices set the foundation for creating workflows that are easy to manage and effective.
Map Clear Relationships Between Triggers and Actions
Once you've nailed down simple conditions, the next step is mapping out clear trigger-to-action relationships. A visual map can be a game-changer - it helps you spot gaps in logic and avoid making assumptions. Rui Nunes, Founder of sendXmail, puts it perfectly:
"The most effective automation workflows feel completely unpredictable to the recipient, even though they're meticulously planned".
To achieve this, focus on triggers tied to high-intent actions, like visits to pricing pages or downloads of key resources.
Timing is another critical factor. For conditions based on form submissions or property updates, include a 5-minute delay. For web analytics triggers, such as page views, opt for an 80-minute delay. Always include a fallback branch to account for missing data or unmet criteria. These strategies ensure your workflows stay accurate and adaptable.
Limit Nested Conditions
Deeply nested conditions can become a maintenance nightmare. Workflows with more than 15 decision points are not only difficult to manage but also prone to errors. Adlon Pereira from TinyCommand highlights this issue:
"Overly complex conditions can make workflows harder to manage and troubleshoot".
Instead of piling on multiple "If" statements, use logical operators like AND/OR within a single condition. This approach allows you to check multiple variables at once, making your workflow cleaner and more efficient. If things still feel too complicated, consider breaking down large workflows into smaller, more manageable ones.
The aim is to use conditional logic to simplify - not complicate - processes. By keeping workflows streamlined, you’ll make them easier to manage and far more effective.
sbb-itb-6e7333f
Testing and Improving Conditional Workflows
Test Workflows Before Launch
Testing is the backbone of a successful workflow. It’s not just about making sure the workflow runs - it’s about ensuring it performs as intended. Before launching a conditional workflow, simulate scenarios like form submissions or user actions. Use dummy email addresses to test different paths (e.g., "if email opened" versus "if not opened") and confirm that your logic works as planned.
Speed up delays during testing - for example, reduce a 2-day wait to 2 minutes - so you can quickly verify the journey. Double-check dynamic content, such as merge tags like {{first.name}}, to ensure they work across various data formats and have proper fallbacks. Don’t forget to test edge cases by using diverse data inputs, like varying string lengths or formats, to prevent personalization errors.
Email marketing expert Carin Slater emphasizes the importance of thorough testing:
"Slow down and double check, before you move on. Then..check again."
Your infrastructure also needs to be validated, especially when comparing enterprise email marketing solutions for your stack. Confirm SMTP connections, domain authentication (SPF, DKIM, DMARC), and check your IP reputation. Considering that 51% of emails never make it to the inbox - with 26% landing in spam and 25% not delivered at all - this step is critical. Use a staging environment with a fake SMTP server to avoid accidentally sending test emails to real users. Once launched, keep an eye on performance and refine your workflow as needed.
Track Performance Metrics After Launch
After ensuring your workflow functions properly, tracking live performance is the next step. Measure engagement metrics like open rates, click-through rates (CTR), and conversion rates for each branch of your workflow. This helps you identify where leads might be dropping off. For reference, the average email open rate across industries is about 17.13%, while the average CTR is approximately 10.25%.
Monthly performance reviews can highlight weak points in your workflow. For example, use the Email Quality Score (EQS) formula - 1 - (Unsubscribes / Unique Clicks) - to evaluate whether your content resonates with subscribers or is causing opt-outs. If non-opener branches underperform, experiment with adjusting resend timings or tweaking subject lines to improve open rates.
Incorporate A/B testing into your workflows and let tests run for at least 48 to 72 hours to ensure reliable results. This approach can significantly boost campaign effectiveness, as email programs that use A/B testing report an average ROI of 36:1. Camila Espinal, Email Marketing Manager at Validity, explains the value of A/B testing:
"It gives you the data you need so you can step away from taking a shot in the dark and use real information to sharpen your campaigns, improve engagement, and connect with your audience."
Don’t forget to audit your lead scoring rules every 30 days. If conversion rates are lagging, adjust the point values assigned to specific triggers. This feedback loop ensures that your entry criteria evolve based on the attributes of leads who are successfully converting. By combining rigorous testing with ongoing performance tracking, you can fine-tune your workflows to align with behavior-driven strategies and achieve better results.
Using Integration and Segmentation to Improve Workflows
Segment Lists with Conditional Triggers
Dynamic segmentation is a game-changer for conditional logic. It keeps your lists updated in real-time, automatically adding new buyers and removing those who’ve been inactive for 90 days. This ensures your triggers target the right people at the right time.
The results speak for themselves: segmented campaigns see 14.31% higher open rates and a staggering 101% higher click-through rate compared to non-segmented campaigns. Adrian Nikolov from MobiSystems, Inc. highlights the impact:
"Tailored messaging makes a big difference, especially when aligned with user lifecycle stages. This segmentation approach boosts our open rates by at least 20% compared to batch-and-blast campaigns."
To maximize the effectiveness of behavioral triggers, combine multiple data points. For instance, you can layer conditions like visits to pricing pages with content downloads to create highly targeted segments. Use suppression lists for users inactive for 60–120 days and establish clear exit conditions once contacts convert. Mapping behaviors to lifecycle stages - Lead, MQL, SQL, Customer - ensures subscribers move seamlessly between workflows as they progress.
Simplicity in data management is critical. Replace free-text fields with dropdown menus to avoid inconsistencies such as "HubSpot" versus "hubspot", which can disrupt conditional logic. Adopt progressive profiling to collect data incrementally - ask for a name in the first email and interests in the second - to build detailed profiles without overwhelming subscribers. Also, implement frequency caps (like one email per day) to avoid fatigue when contacts qualify for multiple segments.
Dynamic segmentation is even more powerful when paired with CRM integration, which takes targeting and lead management to the next level.
Connect Workflows with CRM Systems
Integrating workflows with CRM systems creates a unified data foundation that enhances conditional logic. A bidirectional sync between your email platform and CRM ensures real-time updates. For example, when someone opens an email, their CRM record is updated instantly. Similarly, when a CRM status changes - like moving from "Lead" to "MQL" - the workflow adjusts automatically, triggering or pausing the appropriate email sequence.
The financial benefits are impressive. Automated workflows integrated with CRM data generate $16.96 per recipient, compared to just $1.94 for standard emails. Companies that combine email and CRM tools report a 23% average increase in email conversion rates. Jenny Romanchuk from Artisan captures the essence of this synergy:
"When your CRM and email platform finally work together, your entire inbound and outbound motions change."
Advanced lead scoring also becomes seamless with integration. Conditional logic can update lead scores in the CRM based on email interactions - like opens, clicks, and downloads. When a score reaches a set threshold, the workflow automatically assigns the lead to a sales rep and creates follow-up tasks. Sales teams can even receive instant notifications when high-intent actions occur, such as visiting a pricing page or accessing a case study.
Integration also enables deep personalization. Workflows can adapt messaging based on CRM fields like industry, company size, region, or purchase history. Before integrating systems, audit and clean up CRM data to avoid issues caused by duplicate or incomplete entries. Follow best practices for delay protocols to ensure data syncs correctly before branching conditions are applied. Always prioritize two-way sync to maintain accurate reporting and prevent segmentation errors.
ActiveCampaign Conditional Logic Tutorial to Make Smarter Automations [18]
Documentation and Mobile Compatibility
Maintaining efficient workflows with conditional logic depends heavily on clear documentation and mobile-ready designs.
Document Your Conditional Logic Rules
Clear documentation is critical for conditional rules. Without it, teams can encounter blank tokens, conflicting offers, and expensive QA processes. To avoid this, assign each rule a unique name (up to 50 characters) and a detailed description (up to 255 characters).
Identify the "source of truth" for each data field, including the data owner, refresh frequency, and criteria for "empty" values. For more complex workflows, decision tables in formats like JSON or YAML can clarify rule precedence and simplify QA efforts. Tools such as Lucidchart or Miro are great for visually mapping decision points and showing how conditions branch throughout the workflow. This approach supports the creation of simple, understandable, and testable logic.
Structure documentation according to the workflow's sequence, specifying both "Then" and "Else" actions. For instance, if a "Then" action makes a field visible, the "Else" action should hide it. To ensure accessibility and compliance, save and export rules as PDFs for audits.
Optimize for Mobile Devices
With 42% of emails opened on mobile devices - and iPhones alone accounting for 28% of those opens - your workflows must be mobile-friendly. Stick to single-column layouts between 600 and 640 pixels wide for better readability on smaller screens. Make sure all interactive elements meet the minimum touch target size of 44 × 44 pixels.
Test workflows on older or low-memory mobile devices to ensure smooth performance. Use seed email addresses to check how logic-driven content appears across platforms like Gmail, Outlook, and Apple Mail on mobile. Be aware that iPhones automatically enlarge fonts smaller than 13 pixels, which can disrupt your layout. To avoid accidental overwrites, set target questions impacted by conditional logic to "Read only" for mobile users. For hidden fields needed in downstream calculations, use the "Not Visible" setting instead of "Ignore", as ignored data is treated as nonexistent and cannot be submitted or referenced.
Checklist: Conditional Logic Best Practices
Here’s a handy checklist to help ensure your conditional logic workflows run smoothly, delivering consistent and tailored experiences without breaking under practical conditions.
Core Setup:
- Clearly assign ownership for each data field, and document what counts as “empty” to avoid broken variables.
- Keep decision trees manageable - deeply nested IF/ELSE structures can make testing exponentially more complex.
- Normalize your data before comparing it by using filters like
downcaseorstripto avoid errors caused by case sensitivity. - Use inline fallbacks with the
defaultfilter (e.g.,{{ user.name | default: "Friend" }}) to prevent blank spaces in production.
Testing & Monitoring:
- Build a preview matrix of synthetic profiles to test every possible logic branch before launching.
- Send test emails to seed addresses across platforms like Gmail, Outlook, and Apple Mail to check for layout issues.
- Keep an eye on fallback usage rates - if more than 10% of critical fields rely on fallbacks, it indicates a data pipeline problem that needs immediate fixing.
- Monitor render error rates and set up automated alerts if they go above 0.1%.
Mobile & Documentation:
- Stick to single-column layouts between 600 and 640 pixels wide, and ensure all interactive elements have a touch target size of at least 44 × 44 pixels.
Performance Guardrails:
- Use "assign" tags to calculate values once, avoiding repeated complex comparisons.
- Pause or roll back new conditional logic if there’s a noticeable spike in unsubscribe rates or render errors.
- Conduct A/B tests comparing personalized and generic content to confirm that your conditional logic improves engagement or revenue per recipient.
FAQs
How do I choose the right triggers for my workflow?
To choose the best triggers, pinpoint the exact events or conditions that kick off your workflow - these could be user actions or system-generated events. Examples of triggers include sending a message, creating a ticket, or other actions relevant to your goals. Make sure your triggers align with your audience's behavior and your campaign objectives. This helps ensure workflows begin at the ideal time, boosting engagement.
What’s the safest way to test every branch before launch?
Testing every branch of your email workflow is best done through staging environments, pre-send tests, and carefully verifying elements like triggers, personalization, and links. Pay close attention to potential issues such as broken links or logic errors that could disrupt the user experience. Conducting thorough QA - such as multiple test sends and reviewing dynamic content - helps you catch errors early and ensures your workflow is polished and ready for launch.
When should I split one complex workflow into smaller ones?
When a workflow becomes overly complicated, error-prone, or hard to handle, it's a smart move to break it into smaller, more manageable parts. Why? Smaller workflows are simpler to troubleshoot, which means issues can be identified and fixed faster. They also help minimize mistakes, making the entire process run more smoothly.
On top of that, dividing workflows allows for better data tracking and analysis. It’s easier to gather insights when each part of the process is focused and streamlined. Another bonus? You can create more tailored sequences for specific customer groups, leading to a more personalized and effective experience.