I approve an automated email workflow only after testing who receives it, when it sends, and what happens next. An inbox delivery alone isn't a pass.
My QA flow covers 6 steps:
- Set pass criteria: Define expected results and use isolated test contacts.
- Test workflow paths: Check entry, branches, delays, exits, failures, suppression, and re-entry.
- Review delivered content: Verify personalization, offers, links, plain text, and unsubscribe controls.
- Check clients and devices: Test mobile layouts, dark mode, images-off views, and accessibility, including a 4.5:1 normal-text contrast benchmark.
- Review results: Save test records, retest fixes, and log approval.
- Confirm the release: Clear blockers and match the final build to the tested version.
My release rule is simple: <u>send only the revision that passed QA</u>. If you change it, rerun the affected checks and get approval again - before activation.
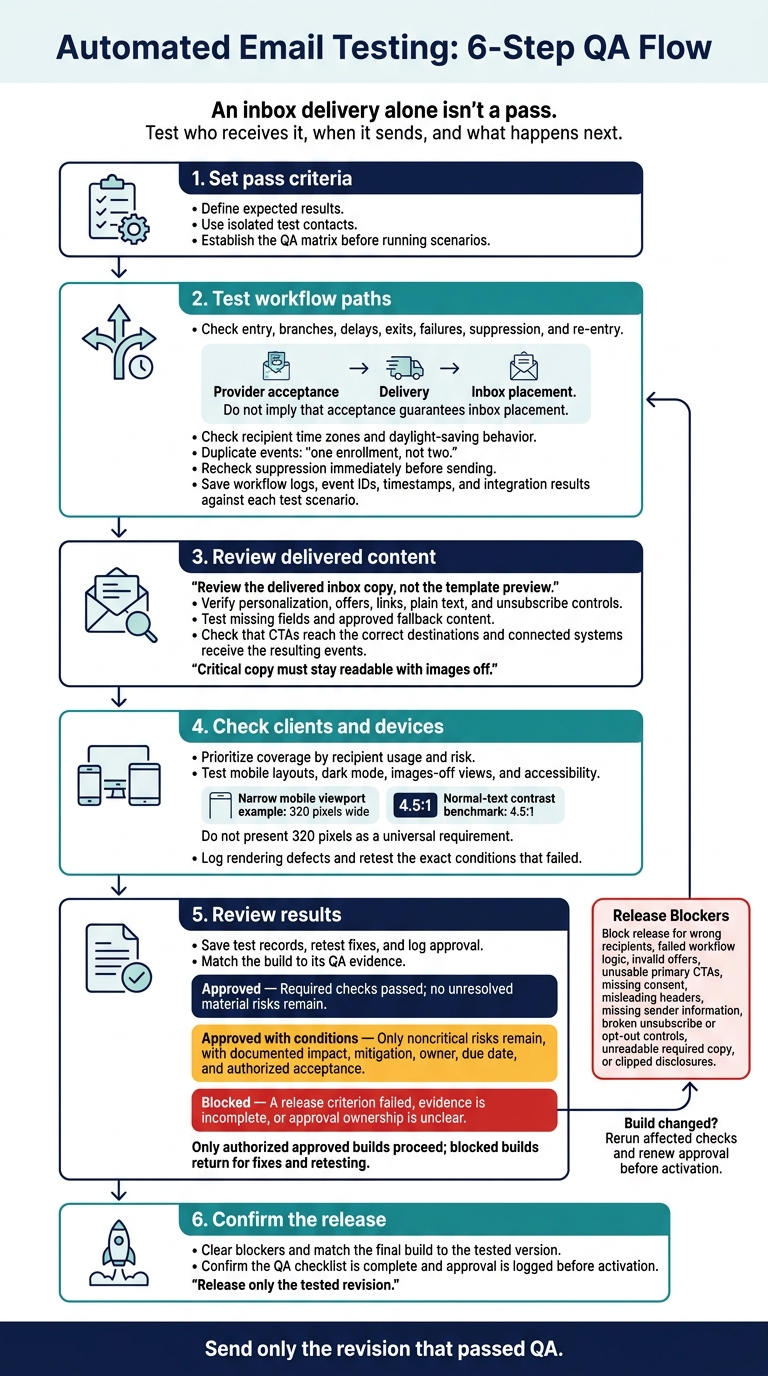
Automated Email Testing: 6-Step QA Flow
Email Testing using testRigor | Email Testing Automation with testRigor: No-Code AI Testing
sbb-itb-6e7333f
2. Test Workflow Paths and Delivery
With the matrix defined, run every scenario through the workflow engine and inbox layers, starting at the event source. Check provider acceptance, delivery, and inbox placement separately. Use Gmail, Outlook, and Yahoo test accounts to check placement, and report only the accounts you tested.
Check Entry, Branches, Timing, and Actions
Confirm that each contact enrolls once and takes the correct branch. Check send windows, delays, business-day scheduling, campaign expiration, and recipient time zones, including daylight-saving behavior. If you shorten delays during testing, rerun the timing scenario in a production-like setup. Short tests can hide scheduling defects.
Use test data that clearly passes and fails each branch condition. Confirm both the path taken and the message sent. Follow the relevant CTAs and complete the intended action: submit the form, redeem the code, complete the account action, or reply to a reply-enabled email.
Check that each destination is correct, uses the intended HTTPS URL, and keeps the required tracking parameters. Then verify that the connected system receives the event and updates the workflow. Record the event ID, timestamps, status changes, and response latency.
Test Exit, Failure, and Re-entry Rules
Once the main path works, test every exit and failure rule. Before the next send, trigger each defined exit: purchase, reply, unsubscribe, hard bounce, goal completion, suppression, manual removal, expiration, or loss of eligibility. Confirm that the workflow blocks the pending message when required.
Test missing data, invalid or malformed addresses, expired or reused tokens, failed integrations, duplicate events, delayed events, and provider deferral events. Check whether each case triggers the expected retry, pause, reroute, or removal.
Verify re-entry eligibility, cooldown periods, and frequency caps for each message type. For duplicate events, confirm that the same event creates one enrollment, not two. Recheck suppression immediately before sending, not just at enrollment.
Automate Checks and Save Test Evidence
After each run, save the evidence in the same matrix row to support the pass/fail decision. Poll test inboxes every 30 or 60 seconds until the deadline. Match messages by test recipient, contact/event ID, and a stable workflow ID or correlation token - not by subject alone.
Assert message fields, links, attachments, headers, and delivery events. Distinguish a timeout from a late arrival. Save raw MIME, headers, link-check results, integration/webhook responses, and error logs with the test result.
Redact personal data, tokens, one-time codes, and unnecessary message content. Restrict access to the evidence and apply a retention period.
3. Review Delivered Content and Links
Review the delivered inbox copy, not the template preview. Once delivery is confirmed, check how personalization, conditional blocks, signatures, and unsubscribe controls appear. Compare each version with the approved brief. A correct template can still deliver blank fields or content meant for a different audience.
Check Personalization, Offers, and U.S. Formatting
Check the subject, preheader, sender details, grammar, and tone. Test missing fields, long values, and special characters to confirm that fallbacks, encoding, and truncation work as intended.
Review each conditional version separately, including versions with missing or expired offer data. The body must deliver on the subject’s promise. Ineligible recipients should see approved fallback content, not a blank offer block.
Verify prices, discount amounts, eligibility, exclusions, and expiration against the approved offer. Paste the delivered code into the target checkout to confirm that the discount works.
Use U.S. formats for currency, dates, times, and units: $1,299.00, October 7, 2026, 2:30 PM ET, miles, and Fahrenheit.
Use U.S. spelling and specify the intended time zone. Check that time-zone conversion does not change the advertised deadline.
Check CTAs, Destinations, and Required Content
Check every linked element: CTAs, text links, logos, images, product cards, social icons, preference-center links, privacy links, and unsubscribe links. Confirm that button labels match their final destinations. Review image sources, useful alt text, and the plain-text version.
Critical copy must stay readable with images off. The plain-text version should contain readable copy, usable URLs, offer details, disclosures, and unsubscribe instructions.
For U.S. commercial email, confirm accurate headers, a nondeceptive subject, a valid physical address, and clear unsubscribe instructions. Honor opt-outs within 10 business days and keep the mechanism live for 30 days after sending. Check applicable consent rules and disclosures with the compliance owner.
Automate checks for unresolved merge fields, malformed URLs, missing required text, and absent unsubscribe controls. Keep human review for meaning, tone, visual hierarchy, accessibility context, and compliance interpretation. Passing checks do not equal approval.
4. Test Email Clients and Devices
Once workflow and content checks pass, test how the delivered email displays in the clients and on the devices recipients use.
Set test coverage by recipient usage and risk. Use platform performance data, device reports, customer research, and support tickets to prioritize the most-used environments. Start with Gmail desktop web, Outlook on Windows, Apple Mail, Gmail on Android, and Outlook Mobile. Add iPhone or other priority devices when audience data supports it. Treat open data as a starting point, not the full picture: Apple Mail Privacy Protection distorts it.
Check Layout and Accessibility
Test desktop layouts and at least one narrow mobile viewport, such as 320 pixels wide. Check column stacking, font fallback, image scaling, button size and tap area, and horizontal scrolling. Add long personalization values to catch wrapping and clipping. Use client previews to cover more environments, then verify high-priority combinations on real devices.
Test relevant clients in light and dark mode, with images on and off. Watch for missing logos and inverted colors. Use 4.5:1 contrast for normal text as the accessibility benchmark. Check button readability, descriptive links, image alternatives, and reading order. Use VoiceOver or NVDA and keyboard navigation where supported. For image-heavy emails, test on both Wi-Fi and cellular connections to spot delayed content and layout shifts.
Log and Retest Rendering Defects
For each failure, attach a screenshot or delivered .eml file with the client and device context. Record the template version, client and application version, device, operating system, viewport, display mode, image-loading state, test account, severity, expected result, actual result, and steps to reproduce it. Keep customer personal data out of the evidence.
Treat unusable primary CTAs, unreadable required copy, and clipped disclosures as release blockers. Minor spacing differences usually rank lower.
Retest the exact conditions that failed, then check related environments. A responsive CSS change needs desktop and mobile regression checks. A color change needs light-mode, dark-mode, and contrast checks. Keep the original failure evidence and attach the corrected rendering. Close the defect only after recording the tester, result, U.S.-formatted date and time, and any remaining limitation.
Carry unresolved rendering defects into release review.
5. Review Results and Approve Release
Once workflow, content, and rendering checks pass, use the evidence to make the release decision.
Approve only the workflow revision that was tested. Match the release build to its test matrix, delivered messages, workflow logs, link checks, rendering results, and defect retests. Confirm that testing covers entry, branches, delays, exits, failures, and re-entry. If evidence is missing, the release isn't ready.
Define Release Blockers and Document Approval
Block production sends for wrong recipients, failed workflow logic, invalid offers, unusable primary CTAs, missing consent, misleading headers, missing sender information, or broken unsubscribe or opt-out controls. Rank other defects by audience impact, likelihood, and mitigation - not launch timing.
Record the final build version, test timestamp, evidence links, defect IDs, fixes, residual risks, owner, approver, and planned activation time, including the time zone. Name an approver who has authority over the send. For high-impact programs, the builder shouldn't be the only reviewer. Require an explicit decision rather than treating silence or a chat reply as approval.
| Decision | Release requirement |
|---|---|
| Approved | Required checks passed; no unresolved material risks remain. |
| Approved with conditions | Only noncritical risks remain, with documented impact, mitigation, owner, due date, and authorized acceptance. |
| Blocked | A release criterion failed, evidence is incomplete, or approval ownership is unclear. |
Approved builds move to the final pre-release checklist.
Reuse QA Records and Assess Tools
Archive the matrix, controlled test data, evidence, defects, and approval record as a reusable QA package. Copy the matrix for later revisions, but rerun any checks affected by changes to audience rules, triggers, timing, content, links, templates, integrations, or sending infrastructure.
Mark results passed, failed, not applicable, or not retested. Material changes require renewed approval. Past results don't prove that a new build passed.
Assess email marketing platforms for isolated testing, automated assertions, relevant rendering coverage, version tracking, and exportable evidence. Verify those capabilities through provider documentation and product testing.
6. Complete QA Before Release
Run the approved QA matrix one last time before activation. Confirm that the release build matches the tested revision.
Verify that test contacts covered every required path without reaching real customers or touching production systems. Check delivered emails, not previews, for correct personalization, working links, readable plain-text output, and usable unsubscribe controls. Confirm coverage across the audience’s main devices and email clients, including mobile, images-off, accessibility, and dark-mode checks.
Activate only when the QA checklist is complete, all blockers are cleared, and approval is logged. Release only the tested revision. If the build changes before release, rerun the affected checks and renew approval.
FAQs
How can I safely test production-only email triggers?
Test field mappings, workflow logic, and data flows in staging or a sandbox first. Then run a production pilot with a randomized holdout group. Record baseline delivery and conversion metrics before the full rollout.
Keep rollback procedures and pause controls ready. For technical integrations, use logging and monitoring to track errors in real time. Use idempotency keys to prevent duplicate sends.
Which email QA checks should I automate first?
Start with compliance and deliverability: check for broken links and missing unsubscribe options, verify SPF/DKIM/DMARC, and confirm real-time monitoring is in place. Next, check DNS, tracking pixels, and whether links and assets work correctly.
For high-volume sends, check address syntax, domains and mailboxes, SMTP/load testing, and SSL/TLS readiness. Then test automated workflows, starting with onboarding journeys. Set alerts for metric drops, including sends falling to zero.
How do I monitor workflows after launch?
After launch, track dashboard metrics continuously: opens, clicks, conversions, bounces, unsubscribes, and spam complaints. Review them within 48 hours, then weekly and monthly.
For technical workflows, use logs, webhooks, and real-time error notifications. Timestamp API and integration errors, and record the exact error messages and affected records or segments.
Monitor compliance through real-time scans and alerts. Run quarterly audits of consent, opt-outs, and thresholds for bounces, complaints, and unsubscribes.