Most onboarding emails fail for one simple reason: they send by date, not by user behavior. If a user gets stuck on Day 1, a Day 3 email is already late. And when 68% of new B2B SaaS users who miss first value in the first 7 days never convert, timing by behavior matters more than timing by calendar.
I’d sum the article up like this: if you want more users to activate, invite teammates, and convert before trial end, build onboarding around events and non-events. That means sending emails when someone signs up, logs in, stalls, skips setup, avoids team invites, hits trial checkpoints, or goes quiet after showing intent.
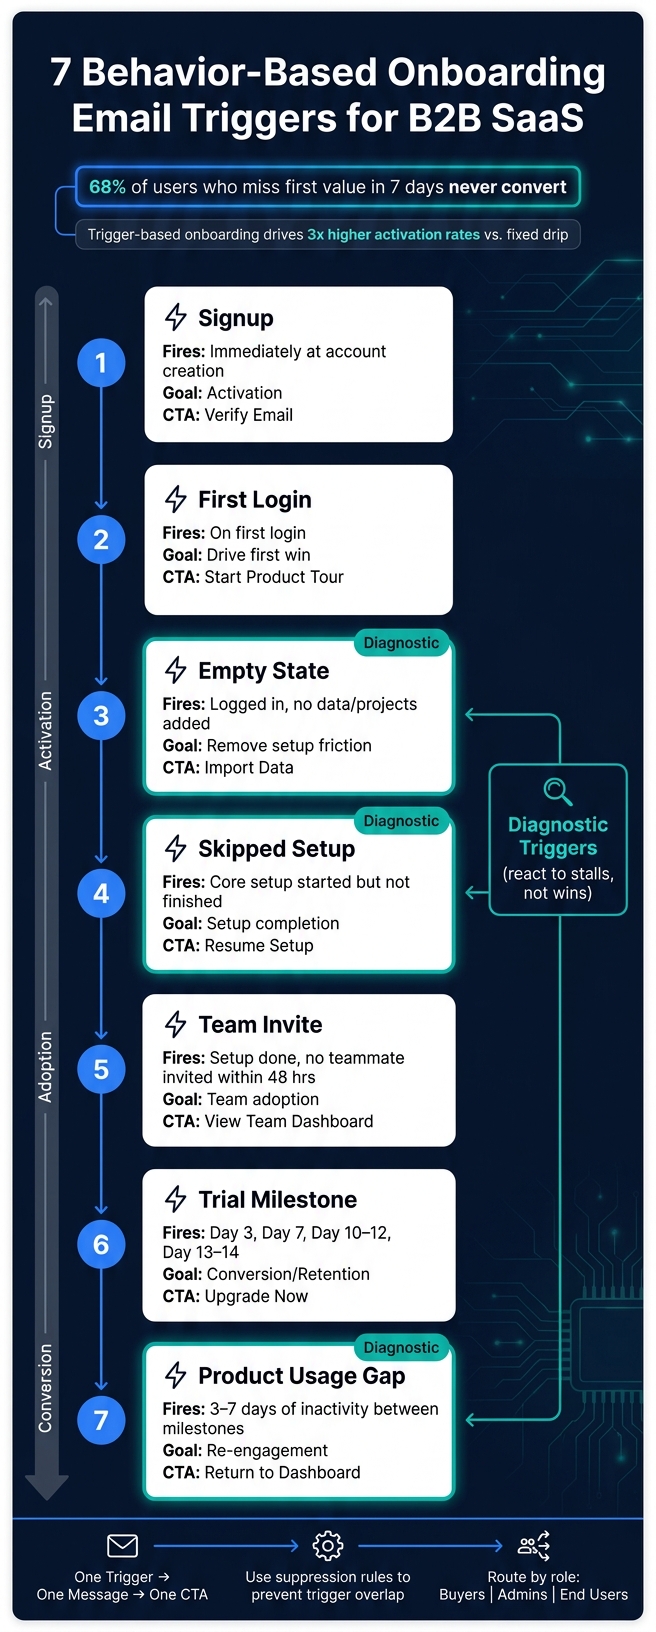
Here’s the full set covered in the piece:
- Signup - send at account creation with one next step
- First login - point the user to their first win
- Empty state - help users who logged in but did nothing
- Skipped setup - bring users back to the exact step they left
- Team invite - prompt collaboration after solo value
- Trial milestone - branch messages by trial stage and activity
- Product usage gap - react when progress stops between milestones
The big theme is simple: one trigger, one message, one CTA. I’d also keep overlap under control with suppression rules and priority logic so users don’t get hit with multiple emails at once.
7 Behavior-Based Onboarding Email Triggers for B2B SaaS
The Ultimate SaaS Onboarding Playbook with Justin Hammond
sbb-itb-6e7333f
Quick Comparison
| Trigger | What it reacts to | Main job | Best email angle |
|---|---|---|---|
| Signup | Account created | Get the user into the product | Confirm and point to one next step |
| First login | First session starts | Drive first win | Show what to do first |
| Empty state | Logged in, but no setup work done | Remove setup friction | Call out the missing first action |
| Skipped setup | Setup started, not finished | Recover stalled users | Link back to the exact unfinished step |
| Team invite | Core action done, but no teammates added | Push team adoption | Show the team outcome |
| Trial milestone | Trial day or milestone reached/missed | Move toward paid conversion | Match message to trial progress |
| Product usage gap | Activity drops between steps | Re-engage before trial loss or churn | Name the stall and give one next move |
If I were building this flow, I’d start with the stalls that block first value, then add trial checkpoints, then inactivity emails.
Why trigger-based onboarding emails beat fixed drip schedules
A fixed schedule often misses the moment.
It sends the wrong email to the right user and the right email to the wrong user. In one case, the message is redundant. In the other, it shows up too late to be useful.
With trigger-based onboarding, the flow changes based on what the user does - or doesn’t do.
If a user completes setup, they skip the setup nudge and move straight to the next milestone. If a user signs up but doesn’t log in for 48 hours, they get an email built to remove the specific friction blocking their return. That’s the key difference: a diagnostic email goes after the exact point of friction, while a generic reminder just fills space.
Behavior-sequenced onboarding can lead to 3x higher activation rates compared to non-sequenced approaches.
Here’s the practical difference:
| Trigger-Based | Fixed Drip | |
|---|---|---|
| Logic | Responds to user actions or inactivity | Fires based on days elapsed since signup |
| Relevance | Adapts to where the user actually is | Often sends redundant or mistimed content |
| Goal | Activation | Awareness |
| User experience | Feels guided | Can feel mistimed |
Next, the seven triggers show how to turn that logic into a live onboarding flow. It starts with the first event: signup.
1. Signup trigger
Trigger condition: User clicks "Sign Up", creates an account, or starts a free trial.
Send this email right after signup. The goal is simple: confirm the account, set expectations, and drive one clear next step. The first email should help the user get to login - not just confirm that the account exists.
Keep it short. Use a single CTA, like:
- verify email
- finish profile
- start a short intro
Send it from a real person, not a no-reply address, so users can get help fast if they need it.
Ask one signup question, then tailor the first message based on role, use case, or company size. Those signup details should decide which onboarding path the user enters next.
After signup, the next trigger is first login. At that point, the message should shift from confirmation to activation as part of a broader lifecycle email strategy.
2. First login trigger
Trigger condition: User logs in for the first time.
The job of this email is simple: turn that first login into a first win.
This is the point where onboarding moves past confirmation and into activation. A new user lands on an empty dashboard and thinks one thing right away: "What do I do now?" Your email should answer that fast.
The main goal isn't to show off features. It's to reduce cognitive load. Between 40% and 60% of users who sign up for a B2B SaaS free trial log in once and never come back. So that first session matters a lot.
Keep the email focused on one CTA tied to the user's role. For example:
- Admins invite a teammate
- Managers open a quick-start guide
Use one CTA per email.
Also, don't treat a one-minute first session like a low-intent visit. Treat it like a friction signal. If that happens, send a targeted follow-up within 48 hours - not a generic reminder. Say it plainly: "It looks like you haven't created your first [item] yet. Start here." That kind of message lowers the barrier to coming back without over-explaining.
If the dashboard is still empty, the empty-state trigger should take over.
3. Empty state trigger
Trigger condition: The user has logged in, but they still haven't added data, connected an integration, or imported records.
Use this when a first login ends with a blank product state - not when someone already finished a key action.
Think of this as a diagnostic email. Call out the missing step, explain where the user likely got stuck, and give them one simple next step.
Send it after 24 to 48 hours of inactivity. If the user dropped off during a specific workflow, send it within 2 hours. Keep the message focused on one action only - for example, "Import your first 100 contacts" or "Create your first project" - and link straight to that setup step.
To cut setup friction, offer a migration call or a pre-built template.
If the user began setup but stalled on a required step, the next email should come from the skipped setup trigger.
4. Skipped setup trigger
Trigger condition: The user started a core setup flow - like importing contacts, connecting a data source, or creating a project - but didn’t finish it.
Use this trigger when someone begins setup and then drops off partway through. That’s different from an empty state trigger, where nothing has started yet. In this case, the drop-off points to friction. So this isn’t a reminder email. It’s a friction email.
Call out the exact step they left unfinished and the likely sticking point. Then give them one clear next action. Sleeknote, for example, sends re-engagement emails to users who haven't published their first campaign, with a direct link back to the unfinished step. That link should take the user straight to the screen where they stopped - not to a broad dashboard. It also helps to pair the email with a 2-minute walkthrough or a template for that step.
Timing matters here. Send the email within 24-48 hours after the stall. Use the 24-hour mark when the user finished the prior step but didn’t move to the next one. Include a reply option for people who got stuck and want help. One mid-market project management company that put behavior-triggered onboarding emails in place for skipped setup steps - including the "create a project" milestone - saw activation rates move from 25% to 52% within 30 days.
Once setup is done, the next signal to watch is collaboration - not more setup.
5. Team invite trigger
Trigger condition: The user has finished the initial setup or hit a core action - like creating their first project - but still hasn't invited a teammate.
Once someone gets value on their own, the next step is getting the team in. After that first core action, send a prompt to invite others. If no invite happens within 48 hours, that's your cue. The email should name the friction and show the team payoff in a single line.
Lead with the result for the team, not the feature itself. So instead of "Invite your team to use [Product]", open with the outcome: shared dashboards, real-time co-editing, or team-wide reporting. Invited users tend to convert faster and churn slower than cold sign-ups.
Send this email 24 to 48 hours after the first core action if no invite has happened. Use Day 7 only as a final nudge.
If the invite still doesn't happen, move to the trial-day milestone trigger.
6. Trial day milestone trigger
Trigger condition: A set point in the trial passes, or the user completes or misses a key action that shows if they're on pace to convert.
Once a user has invited teammates or finished core setup, move to trial-day checkpoints that measure readiness to buy.
Use trial-day milestones to branch onboarding based on where the user is in the trial, not a rigid calendar. Strong sequences split on both positive and negative events. When someone misses a milestone, treat it like a signal, not a nudge. Name what's stalled, then give them one simple next step.
Use the table below to pair each checkpoint with one clear message and one CTA.
| Milestone | Timing | Behavior | Message / CTA |
|---|---|---|---|
| Value Bridge | Day 3 | Active | Try [Feature] |
| Re-engagement | Day 3 | Inactive | Most people find the blank canvas daunting - here's one thing to do first |
| Social Proof | Day 5 | Active | Explore templates or a peer case study |
| Upgrade Prompt | Day 10–12 | High usage | View pricing / Upgrade now |
| Trial Expiry | Day 13–14 | Active or inactive | Subscribe now / Extend trial |
Each email should push exactly one action. More than one CTA splits attention and cuts clicks. That matters most in Days 1–7: 68% of users who miss their first value milestone in that window never convert.
If a user stalls between checkpoints, the next trigger is the product usage gap.
7. Product usage gap trigger
Trigger condition: Product usage gaps are missed actions that show a user is stuck before reaching value. This trigger fires when a user does not move to the next milestone within a set window.
When a user stalls between milestone emails, switch to a usage-gap trigger. This is the point where the earlier flow - signup → first login → setup → adoption - breaks, and the usage-gap trigger takes over.
Match the message to the stall: inactivity, incomplete adoption, or high-friction support. Call out the exact stopping point. For example: "It looks like you started importing your data but haven't run your first report yet." Then give them ONE next step.
Use the table below to match each gap to timing and CTA.
| Gap Type | Timing | Core CTA |
|---|---|---|
| Started core action, didn't finish | 2-24 hours post-abandonment | "Continue [Specific Action Name]" or "Watch 2-minute walkthrough" |
| Active user goes quiet | 3-7 days of inactivity | "Return to [Feature Name]" |
| Trial ending, low usage | 2-3 days before expiry | "Hit reply and tell us what's stuck" |
Next, compare the seven triggers by timing, goal, and message.
Onboarding triggers compared: timing, goal, and message at a glance
Use this table to line up each trigger with the moment it shows up, what it’s meant to do, and the message it should send.
| Trigger | When It Fires | Logic Type | Primary Goal | Main Message | Primary CTA |
|---|---|---|---|---|---|
| 1. Signup | Immediately after account creation | Behavior-based | Activation | Welcome; verify email; set expectations | Verify email |
| 2. First Login | On first login | Behavior-based | Activation | First-step guidance | Start product tour |
| 3. Empty State | When a user logs in but has no data or projects | Behavior-based (no action) | Activation | Start with a template | Import data |
| 4. Skipped Setup | When a core action is started but not finished | Behavior-based (no action) | Setup completion | Resume setup | Resume setup |
| 5. Team Invite | When a user completes setup but has not invited a teammate | Behavior-based (no action) | Team adoption | Show team value | View team dashboard |
| 6. Trial Milestone | At fixed intervals: Day 3, Day 7, or a few days before expiry | Time-based | Conversion / retention | High usage: upgrade; low usage: check-in | Upgrade |
| 7. Usage Gap | After 3–7 days of inactivity from a previously active user | Behavior-based (no action) | Re-engagement | Acknowledge the change in pattern; highlight what's new | Return to dashboard |
Empty State, Skipped Setup, and Usage Gap are diagnostic triggers. They react to a stall, not a win.
Map the trigger to the right moment first. After that, the next place teams usually slip is execution.
Mistakes to avoid when building onboarding trigger emails
These seven triggers only work when they don’t stack on top of each other.
A single user can hit more than one trigger in the same day. Signup, empty state, skipped setup, and team invite can all apply at once. If you don’t have mutual-exclusion logic in place, those emails can pile up and land before the user gets to first value.
The fix is simple: set mutual-exclusion rules so only the highest-priority trigger sends. A 24-48 hour buffer also helps stop emails from going out too early. After you’ve handled overlap, the next job is just as important - stop emails the second the user moves forward.
Suppression rules matter just as much as send rules. If someone finishes the step tied to an earlier onboarding email, suppress that email right away and move them into the next sequence.
Role-based routing is another spot where teams slip. Use signup data to send each role into the right path:
- Buyers need outcome-focused messaging
- Admins need setup guidance
- End users need quick-start help
One more thing: each triggered email should have one CTA. Early in onboarding, extra choices slow people down. Keep it to one CTA per email.
With the trigger logic cleaned up, the last step is picking the simplest version of each email.
Conclusion
The takeaway is simple: trigger-based onboarding works because it reacts to what users do, not to dates on a calendar.
Taken together, the seven triggers help move users from signup to activation, adoption, conversion, and re-engagement. The right trigger at the right time shifts onboarding from a string of emails into a series of decisions.
Once the core activation trigger is live, add the rest in this order: start with the activation trigger tied to the biggest point of friction, then add trial milestones and inactivity detection.
In onboarding, the action a user doesn't take is often the signal. Behavior - not schedule - should decide the next email. Built this way, onboarding feels like a guide, not a campaign.
FAQs
How do I prioritize triggers if users qualify for multiple emails?
Prioritize triggers tied to activation milestones, not a fixed sending schedule.
If a user qualifies for more than one email, use suppression logic to pull them out of the onboarding flow as soon as they hit a milestone. That keeps them from getting messages that feel irrelevant or repetitive.
When users stall, shift them out of the standard sequence and into a help-focused branch. Priority should come from real-time product behavior, with time-based fallbacks used only when needed.
Which onboarding trigger should I build first?
Start with the activation milestone right after signup: the welcome or “next best action” email that moves users toward first value. In most cases, that means “finish setup” or “connect a first data source,” sent within 5 minutes of signup.
That gives the sequence a clear anchor tied to user behavior, not guesswork. From there, add nudges for people who stall and confirmation emails for later milestones like setup completion or team invites.
What events should I track for these triggers?
Track product events - and non-events - tied to each trigger:
- signup completed, first login, setup completed or skipped
- team invite sent, accepted, or still pending
- core feature activation, usage gaps, and trial milestones
Match each email to the exact event or state. Then stop sending it once the activation milestone is reached.